Sure here is the Williams,Care to share the STL?")
You are using an out of date browser. It may not display this or other websites correctly.
You should upgrade or use an alternative browser.
You should upgrade or use an alternative browser.
3D Printers and Pinball
- Thread starter mwong168
- Start date
Some nice topper designs here for Elvis, Deadpool, Avengers IQ and Junkyard.

 www.thingiverse.com
Harry_Tuttle's Thingiverse Profile
Check out Harry_Tuttle's designs on Thingiverse.
www.thingiverse.com
Chris Bardon
Well-Known Member
Neat-I'd seen a couple of those before, and maybe I'll try that AIQ one. I've never been a huge fan of the topper that's just the name of the game again though. For something like whitewater it makes sense (no name on the translite), but in most cases it's just a little redundant. The one thing I was thinking of there was a second infinity gauntlet (maybe the Iron Man one from Endgame) with the gem LEDs wired opposite to the Thanos gauntlet in the game (so they'd light up as you collected them). I think that's how the official $1000 topper behaves, but that also has a node board in it, so I don't think it'd be possible to trick the game into thinking it was present.
Fifty
Active Member
This is pretty cool, but I'll admit I have no idea how to get 7 degrees out of this? How do you read a bubble level?Mount for a bubble level at 7 degrees.
Corrie
Active Member
The base has the 7 degree slope built into it, so when the bubble is in the center your playfield is at 7 degrees. These levels only have like 2 degrees of range in them so you have to print it to sit at the angle you want.This is pretty cool, but I'll admit I have no idea how to get 7 degrees out of this? How do you read a bubble level?
necro_nemesis
Active Member

necro_nemesis
Active Member

necro_nemesis
Active Member
This one I created just slips onto the rails and has two leds. The interior glows red powered from the GI and the yellow illuminates when the slot is lit.
necro_nemesis
Active Member

necro_nemesis
Active Member
I assumed you use this STL for the battery mod above
 www.thingiverse.com
Pinball Remote Battery Holder by newman25
Here is the "dummy" battery to allow remote placement of an 3xAA battery pack in a pinball machine. Batteries sometimes leak and can ruin the system boards. This allows for the remote replacement of an 3xAA battery pack in the backbox.I believe the screws used were M4, I can't remember and...
www.thingiverse.com
necro_nemesis
Active Member
I started with that but ended up redesigning the file. I didn't like the the thread depth for the machine screws and the file had the holes threaded but I found that the screws easier to start, the part less prone to split and had better bite just self tapping into the plastic by simply chamfering clean holes, The build up height was set to be a good fit with a metal washer, eyelet and the screw to match a AA's length. I also brought the flat face that's there for ease of printing up so it can be installed either way around. This is important because some games were top right + and bottom left - with others it was reversed on the PCB. With these changes all went together well, held together tightly and didn't split using PLA with 20% infill.I assumed you use this STL for the battery mod above
Pinball Remote Battery Holder by newman25
Here is the "dummy" battery to allow remote placement of an 3xAA battery pack in a pinball machine. Batteries sometimes leak and can ruin the system boards. This allows for the remote replacement of an 3xAA battery pack in the backbox.I believe the screws used were M4, I can't remember and...
Link to stl added. https://www.thingiverse.com/thing:5192377

Last edited:
necro_nemesis
Active Member
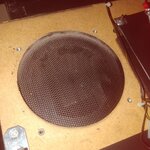
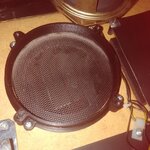
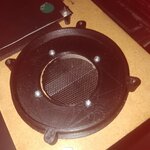
If you're looking for a way to install 2 x 4" speakers in a WPC display panel I've drawn these up in CAD and made stl's available. Basically it sets the speakers back and mounts a 4" in place of the tweeter on the right thereby not requiring the panel to be cut so it can be returned to original configuration. I did this in preparation for a stereo sound board upgrade which would benefit from it producing output from a couple of 4's on their own channels. https://www.thingiverse.com/thing:5191988
necro_nemesis
Active Member
Since I had all the sizes I also created a boring jig file to center the hole around the existing tweeter bore. It's in the same repo as the speaker mounts

necro_nemesis
Active Member


necro_nemesis
Active Member
I'm waiting on a Tilt!Audio board to arrive so I can assemble it. I've already set up the software and configured an RPi with the OS img then added stock and custom sound files. The software has it's own webserver and GUI so once configured using the RPi WiFi I can set it to my own routers domain to access all it's functions and upload customizations through anything running on my LAN. It's pretty straight forward and so far the software seems pretty slick but I'm not a huge fan of Lua if I want to customize some of the software beyond what it presently offers which is enough for most requirements.Thanks for sharing and what else is involved in switching in two 4" speakers in a WPC to improve the sound?
So circling back to the speakers the board has separate channels for left, right and sub as are the audio samples it renders. This requires removal of the wires from the right speaker which are currently just in parallel to the left and relocation back in isolation to the audio header of the board. To play right channel to a choked tweeter isn't going to provide the range of sound the channels will be producing. The most efficient way to approach this is to replace the arrangement with 2 x 4" coaxial speakers with internal crossovers.
Sample audio from TZ. (installer screwed up naming one of the .ogg files oops)
Last edited:
I started with that but ended up redesigning the file. I didn't like the the thread depth for the machine screws and the file had the holes threaded but I found that the screws easier to start, the part less prone to split and had better bite just self tapping into the plastic by simply chamfering clean holes, The build up height was set to be a good fit with a metal washer, eyelet and the screw to match a AA's length. I also brought the flat face that's there for ease of printing up so it can be installed either way around. This is important because some games were top right + and bottom left - with others it was reversed on the PCB. With these changes all went together well, held together tightly and didn't split using PLA with 20% infill.
Link to stl added. https://www.thingiverse.com/thing:5192377 View attachment 21318
Your STL link is broken and would like to download and try this out. Thanks.
necro_nemesis
Active Member
I just downloaded it from the link under the files tab from thingiverse. Maybe thingiverse is messed up att. It's notorious for having issues. I would attach it here but it doesn't meet with the file types allowed. I posted it to a github repo of mine to help you out. https://github.com/necro-nemesis/Space-Cadet-Pinball-Raspberry-debYour STL link is broken and would like to download and try this out. Thanks.
BTW I created a Space Cadet Pinball Debian package including desktop entry then compiled it for Arm to run on Raspberry Pi OS. The deb is in releases for anyone wanting to add the old Windows game to their pi for nostalgic reasons. Arch is Arm so don't be trying to run it on x86_64. The stl file is in that repo.
necro_nemesis
Active Member
I've deleted the file from github to clean up the repo. If you still require it advise. I can create an additional repo for pinball related if file sharing appears to be a requirement. I have a several projects on the go so I like to keep things somewhat organized. The benefit of github is the ability to track changes which helps me keep my thoughts straight with all those. That and it's part of a CI compiler/packager I write code and packages for so it's also it's automation I use regularly. For straight file download someone doesn't need to be conversant with github.