• We have upgaded to the latest version of XenForum and the process finished without any errors!!!! Enjoy the new forum!

Tim's Rescue 911 thread

tim.sanderson

Active Member
I think it's English and German. It seems to have the same stuff written in both languages.
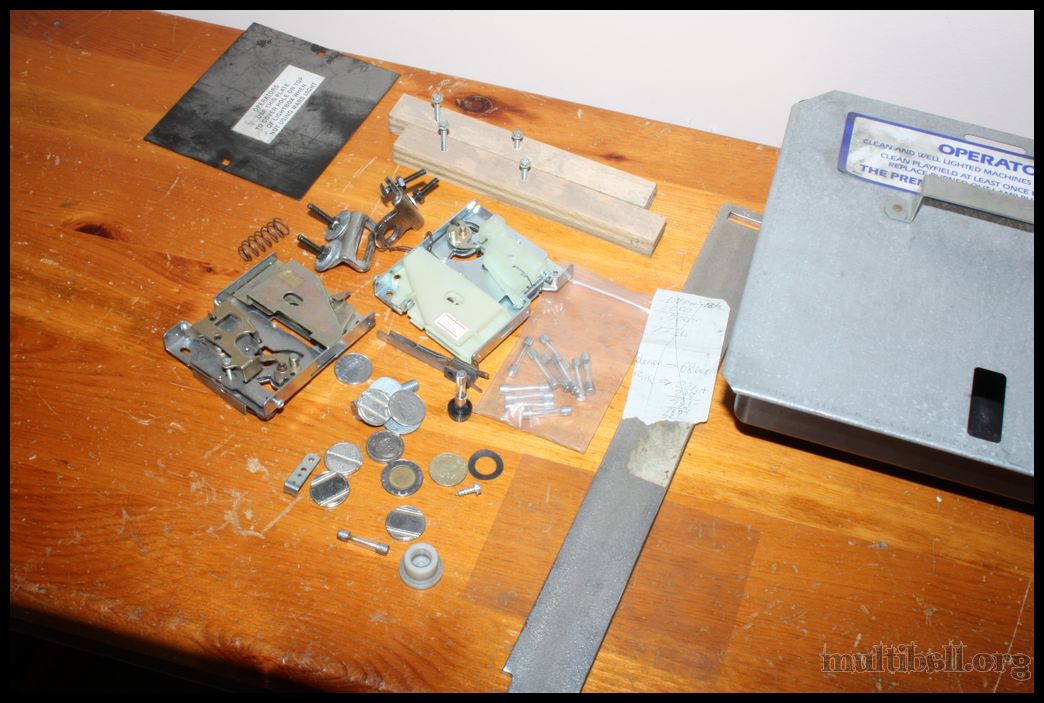
Check out all the stuff that was inside the cabinet:
IMG_2994.jpg

What are those mechanisms there?
 

slacker

Member
Nov 15, 2012
61
3
8
Hamilton Ontario
Hey Tim so far you are guessing pretty good!
The parts with 500 on it are the coin mechs
The big silver bar and the 2 silver parts with the bolts in them are the coin door lock down bar (i'm sure you know that) if you don't have holes on each side of the coin door it was never installed, That's a good thing 4 less holes you have to fill, if they are there just put the bolts in to fill the holes and leave the latch and bar off, The coin box looks nice and clean, there is a switch that could be a spare or a old one that was removed during a repair and just left inside heck it might not even belong to that game. Keep that in mind too just cause its in there don't mean it belongs to that game!
The wood could have been used to hold the playfeild or something elase in place when it was shipped from the factory look and try and match the screws up to holes in the cab or back box.
Good luck
J..
 

tim.sanderson

Active Member
I'm going to try and make it to the Playdium store tomorrow before work to grab my rings and some Novus II. Other than fuses, is there anything else I should buy while I'm there? It looks like there is a Mylar covering on most of the game. Is it Novus II I'll use to clean both the wood and Mylar covered surfaces of the playfield, or is there something better for the wood?
There are a couple couple of worn spots where there is no Mylar. Is it still OK to use Novus on any of the exposed parts, or will that risk further damage?

Tim.
 

REVOLUTION

Administrator
Staff member
Nov 13, 2012
2,314
76
48
46
GTA
www.pinballrevolution.com
Buy Novus 2, new balls, some rags, a couple of microfiber cloths, some PURE carnuba wax (ie. Mothers), some spare fuses (check the manual for common ones, usually 1, 2, 4, 8 SLOW BLOW), some extra packs of bulbs - 44's and 555's.

Take the list of rubbers with you.
 

mwong168

Administrator
Staff member
Nov 14, 2012
6,657
1,416
113
45
Toronto
If you want a copy of the Gottlieb System 3 1989-1996 Repair Guide let me know.
 

tim.sanderson

Active Member
Thanks Brock. I'll be sure to grab all of that stuff.

Mike, thanks but I have a copy of that already. :) Definitely looking forward to getting an actual manual for it. Depending on how big the book is, I may pay a visit to one of the print shops I used to work in and make a PDF version of it. There doesn't seem to be one out there.
 

tim.sanderson

Active Member
The extra jumpers that came with my machine are not for 120v, like I hoped they were. Basically, I need to make one of these:

Into one of these:


I've tried getting the pins to pop out, but it's proving rather difficult. Are there likely to be connectors like this at the Playdium Store, or do I just have to try popping these out to make a 120v jumper?
 

Attachments

  • jumpers.jpg
    jumpers.jpg
    27.3 KB · Views: 3,404
  • 120v.jpg
    120v.jpg
    28.2 KB · Views: 3,404

tim.sanderson

Active Member
I've just noticed the two lower flippers extend to different heights, but when they are resting, they are both level. Is that something that can be adjusted, or is it a symptom of something else? Like two different flipper mechanisms or something?
 

Attachments

  • flipper- end points.jpg
    flipper- end points.jpg
    75.3 KB · Views: 3,387

movingpictures

Active Member
Nov 29, 2012
549
29
28
Mont-Real
tim.sanderson said:
I've just noticed the two lower flippers extend to different heights, but when they are resting, they are both level. Is that something that can be adjusted, or is it a symptom of something else? Like two different flipper mechanisms or something?

Do the flippers extend to the proper length when you press the buttons and aren't pushing the flippers?

If not, have a look at the coils and see if they are different.
You may have a weak coil, or a mushrooming coil stop.
 

Chris Bardon

Well-Known Member
Nov 15, 2012
1,305
165
63
Mississauga, ON
At a minimum, I'd tear those flippers apart and replace the stops/sleeves, and depending on the condition of the mechs, do a full rebuild. The kits you get from pinball life are priced pretty reasonably, and include everything you need.
 

Menace

Well-Known Member
Staff member
Nov 14, 2012
2,440
255
83
Santiago de Aurora
tim.sanderson said:
I've just noticed the two lower flippers extend to different heights, but when they are resting, they are both level. Is that something that can be adjusted, or is it a symptom of something else? Like two different flipper mechanisms or something?

At first glance my guess is either you have two different length plungers or two different length coil stops installed on those flippers. It's definitely a mechanical issue, and not something you can just adjust. You'll need to rip them apart to compare parts to find the culprit.

D
 

tim.sanderson

Active Member
I bought a new power cord to swap out the Italian one it came with. I won't get a chance to do it until tonight, but can I assume that the wire colours will be the same on the new plug, and old? Is green always ground? Or should I test the new cords continuity just to make sure everything's correct?
 

Attachments

  • power and ground wires.jpg
    power and ground wires.jpg
    115.5 KB · Views: 3,353

Menace

Well-Known Member
Staff member
Nov 14, 2012
2,440
255
83
Santiago de Aurora
luch said:
always check , the alternative is a big spark and you saying holly shit.

LMAO!

Yes, never assume... You should just be able to swap the plug on the end of the original cord, and your manual will tell you what colours are what, unless the previous owner for some reason changed the whole cord. In which case you can do a visual on what colours are connected to what in the game and wire accordingly.

D