• We have upgaded to the latest version of XenForum and the process finished without any errors!!!! Enjoy the new forum!

Playfield touch up - Zaccaria Farfalla

DRANO

Super Member
Nov 15, 2012
2,821
517
113
Mississauga
So, I thought I would share this small, but satisfying, little project.

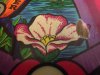
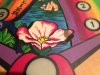
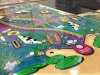
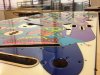
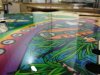
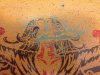
I'm in the middle of cleaning up a Zaccaria Farfalla that I got from one of Gerry's containers a while back. The cabinet is coming along nicely and I'd just been addressing a few small playfield issues in preparation for a clearcoat. The worst of the problems was this flipper drag that obliterated a section of this flower in a highly visible part of the playfield. The artwork is very intricate on this playfield and I was pretty concerned about pulling it off.

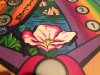
I used a mixture of techniques, but I think the end result was pretty decent.

Here's the starting point
 

Attachments

  • IMG_2621.jpg
    IMG_2621.jpg
    187.8 KB · Views: 1,150

DRANO

Super Member
Nov 15, 2012
2,821
517
113
Mississauga
The first step was to drip some super-thin CA glue into the bare wood and then sand it flush. This will make sure I have a good surface to work with.

Then, using an image of a good playfield, I decided to draw in the missing black outlines and I hand-painted the purple areas on the outside of the flower.


For the white, I mixed up some warm/antique white to match the tone of the flower and masked off the area to airbrush.


Lastly, I mixed up the magenta and experiemetned with different methods. In the end, I dipped a sharp pancil tip into the paint and just dabbed in little dots to get the desired effect.
 

Attachments

  • IMG_3100.jpg
    IMG_3100.jpg
    148.8 KB · Views: 1,149
  • IMG_3105.jpg
    IMG_3105.jpg
    155.3 KB · Views: 1,149
  • IMG_3110.JPG
    IMG_3110.JPG
    175.4 KB · Views: 1,147

DRANO

Super Member
Nov 15, 2012
2,821
517
113
Mississauga
I finished up by re-tracing the black outline just to clean it up.

I found this great acrylic pen at Curry's. Totally safe to use under clearcoat and it makes life really easy for edge-work. I used a 1mm tip but you can get them in varying sizes.

You can see how I easily cleaned up all the inserts in this picture. The pen is pictured below.
 

Attachments

  • IMG_3094.jpg
    IMG_3094.jpg
    225.4 KB · Views: 1,149

mwong168

Administrator
Staff member
Nov 14, 2012
6,657
1,416
113
45
Toronto
Great job as usual Adriano and sure Farfalla stock is going to be a high demand after people see what you have done with yours :D
 

DRANO

Super Member
Nov 15, 2012
2,821
517
113
Mississauga
Thanks!

Here's the full Monty for anyone wondering what an unpopulated Farfalla pf looks like.
It's a very... um "colourful" pin :D
Good thing it's such a fun player.
 

Attachments

  • IMG_3111.JPG
    IMG_3111.JPG
    253.6 KB · Views: 1,146

mwong168

Administrator
Staff member
Nov 14, 2012
6,657
1,416
113
45
Toronto
The game appears to have quite a bit going for it:

- 4 Pop bumpers
- One 3-bank, Two 4-bank, One 6-bank drop targets
- Six flippers (two on the main playfield, two on the upper transparent playfield, and two outlane-save flippers)
- Audio jack located on the cabinet front underneath the ball shooter allows listening to the game via headphones

image-10.jpg
 

DRANO

Super Member
Nov 15, 2012
2,821
517
113
Mississauga
I especially like that the upper playfield is clear acrylic... allowing the entire lower area to remain visible. These game also have an elevated shooter lane, so the playfield almost feels like a wide body.

The "react" flippers give you one shot to save the ball from the outlane if the insert at the entrance is lit. This is very specific to Zaccaria. They were definitely ahead of the curve back in the early 80's when you compare to what Williams and Bally were doing.
 
G

Guest

Guest
Great job on the touch ups!
Can<t wait to see a clearcoated Farfalla and the entire finish product!
Quit your day job,i ll send you my Farfalla after!!! ;)

If you ever need specific pics just ask!
 

DRANO

Super Member
Nov 15, 2012
2,821
517
113
Mississauga
Andre said:
Great job on the touch ups!
Can<t wait to see a clearcoated Farfalla and the entire finish product!
Quit your day job,i ll send you my Farfalla after!!! ;)

If you ever need specific pics just ask!

Thanks!
I'd have to turn over a lot of playfields to quit my day job :)

I appreciate the offer. Hopefully I took enough pics to get it all back together.
This won't be a "high-end" restore. The playfield should be top notch but I just want the cabinet to look decent and clean. That'll be enough for me. I have a few bigger projects waiting for the "full treatment".
 

Menace

Well-Known Member
Staff member
Nov 14, 2012
2,440
255
83
Santiago de Aurora
So jealous... This is the one area of repair I have zero experience with. Good thing you and I can trade services! :)

Looks awesome btw.

D
 

DRANO

Super Member
Nov 15, 2012
2,821
517
113
Mississauga
Menace said:
So jealous... This is the one area of repair I have zero experience with. Good thing you and I can trade services! :)

Looks awesome btw.

D

Haha!
We all have our strengths.... and I'm happy to admit that circuit boards and schematics are not one of mine. They give me headaches in fact :x

Always happy to barter restoration for repair. That's the best transaction of all; everyone wins!
 

DRANO

Super Member
Nov 15, 2012
2,821
517
113
Mississauga
I thought some of you would appreciate this.

I showed the touch-up earlier in this thread. Well... I finally finished the whole playfield. I won't go into detail on every little touch-up, but the clearcoat is done and I can't wait to get this game back together. Here are some pics.
 

Attachments

  • IMG_3221.JPG
    IMG_3221.JPG
    2.7 MB · Views: 923
  • IMG_3724.JPG
    IMG_3724.JPG
    2.2 MB · Views: 923
  • IMG_3723.JPG
    IMG_3723.JPG
    2.2 MB · Views: 923
  • IMG_3726.JPG
    IMG_3726.JPG
    2.1 MB · Views: 923

DRANO

Super Member
Nov 15, 2012
2,821
517
113
Mississauga
Sadly, the cabinet was not in as good shape as the playfield... so I'm having to re-draw some of the stencilled artwork.
The good news is that, by the time this is done, the playfield will be cured and ready to play :)

Here are a couple of before and after pics of the cab in progress.
 

Attachments

  • IMG_3417.JPG
    IMG_3417.JPG
    175.7 KB · Views: 921
  • IMG_3418.JPG
    IMG_3418.JPG
    168.7 KB · Views: 921
  • IMG_3535.JPG
    IMG_3535.JPG
    3.3 MB · Views: 921
  • IMG_3537.JPG
    IMG_3537.JPG
    2.8 MB · Views: 920