• We have upgaded to the latest version of XenForum and the process finished without any errors!!!! Enjoy the new forum!

Pearl Jam MAME update project.

Luckydogg420

Member
May 12, 2013
825
24
18
Kitchener
I had a member of the revolution contact me to update his mame cabinet. It was bought years ago, kinda thrown together, but working. The computer was new-ish and working well.

We decided to give the machine a good once over, improving everything along the way. When I mentioned ideas for a theme the first reply was "Pearl Jam". He wanted better joysticks, preferably ones with leaf switches instead of clicky microswitches. He wanted a trackball, and everything cleaned up.

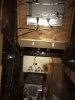
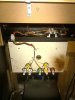
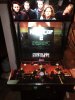
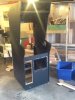
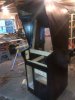
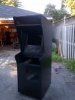
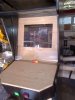
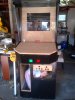
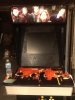
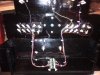
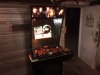
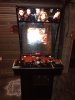
Immediately I asked for pics of what he had so I could see what I was getting into.


It didn't look to bad. Definitely had room for improvement.

So the shopping began.
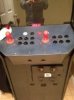
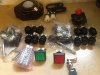
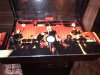
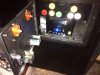
Top row:
Ultimarc trackball, P1, P2 buttons, 4-way ball top joystick
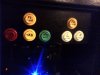
Middle row:
Two 8-way bat top joysticks and new buttons.
Bottom row:
Ultimarc ipac2, START and EXIT buttons, new lock.

The joysticks use all leaf switches, The ball top stick is a regular product at groovygamegear.com. The two 8-way sticks are custom ordered from GGG also. There not listed on the web site, but if you email them they will make them up for you.
 

Attachments

  • image.jpg
    image.jpg
    12.8 KB · Views: 278
  • image.jpg
    image.jpg
    11.3 KB · Views: 278
  • image.jpg
    image.jpg
    251.3 KB · Views: 277

Luckydogg420

Member
May 12, 2013
825
24
18
Kitchener
The first step, once I got the game to my garage was to tear it down to an empty box.


Originally the game had a heavy 19" CRT computer monitor that we were changing to a lightweight LCD screen. The "new" display was a used dell monitor off kijiji. The reason for getting a used display is that finding a LCD screen that has a 4/3 aspect ratio is hard to find cheaply.

I had to cut a new bezel out of plywood to mount the LCD screen. The old bezel was Bristol board.

I mounted a board behind the coindoor to install some service buttons and shot it all with black paint to clean it up
 

Attachments

  • image.jpg
    image.jpg
    152 KB · Views: 277
  • image.jpg
    image.jpg
    941 KB · Views: 277
  • image.jpg
    image.jpg
    1.1 MB · Views: 277

Luckydogg420

Member
May 12, 2013
825
24
18
Kitchener
We discussed different layout options for the control panel. The placement of the sticks, buttons and ball is very important. Last thing you want to do is stub your fingers while playing a heated game.


I did find a gremlin in the machine, so I removed her before the control panel went on


After much thought, I realized there was just not enough room, in order to fit everything and make it playable I would need to build a new control panel box, instead of just creating a new top for the existing parts. I decided the new control panel would need to overhang the sides by a couple inches. ....something like this
 

Attachments

  • image.jpg
    image.jpg
    1 MB · Views: 273
  • image.jpg
    image.jpg
    1.1 MB · Views: 273
  • image.jpg
    image.jpg
    226.2 KB · Views: 272

Luckydogg420

Member
May 12, 2013
825
24
18
Kitchener
Unfortunately I didn't take any pics of building the box, it all went fast.

I ordered posters online to use as the marquee and control panel graphic. Just cut to size and fit in place. The marquee lights were already there, I just moved the bulbs around a bit.

The box was built with 3/4" melamine, and painted it black like the rest of the cabinet. I drilled all the holes,then routed the back side for proper depth on all the pieces. I covered it in plexiglass that has a beveled edge on it. I think it looks good
 

Attachments

  • image.jpg
    image.jpg
    134.8 KB · Views: 266
  • image.jpg
    image.jpg
    1.3 MB · Views: 267

Luckydogg420

Member
May 12, 2013
825
24
18
Kitchener
The top of the control panel flips up to reveal the inside of the box. All the switches are soldered together so there's no fear of something wiggling loose. The trackball and ipac2 connect thru USB to the PC. To connect everything to the ipac board it is very simple. Each switch gets one wire to the ipac2. Each spot is labeled on the ipac2. Then there is one ground wire that daisy chains all the switches together. The control panel is removable for getting thru tight doors, so I made a quick connect to go down to the coindoor buttons.


Down behind the coindoor I have the P1 and P2 "insert coin" buttons. There lined up with the reject coin buttons on the front of the coindoor. So you have to reach down and "put" coins in. Below those two there is the control buttons. These are locked behind the door. There pretty self explanatory. From left to right.

Red: ctrl,alt,del. all three hooked up to one button because its a windows pc. When all else fails, open task manager.
Yellow: tab. This will get you into the mame control settings. Sometime you wanna change it up. Try pong with the trackball instead of the joystick.
Green: enter. To select settings in mame.... No the big green button on the front of the cabinet is not the "enter" key.

The two white buttons are connected to the trackball to run in windows as mouse buttons. It's good to have a little control.

Inside you can see the PC, and at the bottom there a volume control.
 

Attachments

  • image.jpg
    image.jpg
    1.3 MB · Views: 265
  • image.jpg
    image.jpg
    1.4 MB · Views: 265
  • image.jpg
    image.jpg
    1.1 MB · Views: 265

Luckydogg420

Member
May 12, 2013
825
24
18
Kitchener
Ultimarc has a programming tool for the ipac board. So I completely changed the configuration.

The mame default has crazy buttons for player one, shift, ctrl, alt... All the buttons that windows likes to use for hot keys. This can be a real problem for 4 player mame cabs because so many buttons are hit together. So I reprogrammed the board to never use these keyboard keys. Then configured mame to run with my new layout.

One common problem with this is the "Q" key. If you want to run your mame collection with hyperspin, then don't use Q. It just doesn't like it...don't use it.

I did install hyperspin. It is a free to use program, but if you donate to them, you get access to useful graphic and video files that really make your machine look amazing. (I'm a lifetime member). Their forums are very useful, because hyperspin is so customizable.


I'm just waiting for the new bezel graphic to come in so I can place it around the screen (should be tomorrow) and then I can take this baby to its new home.
 

Attachments

  • image.jpg
    image.jpg
    1.3 MB · Views: 265
  • image.jpg
    image.jpg
    817.6 KB · Views: 264

EJB

Member
Nov 17, 2012
51
0
6
This is my machine, and I can't tell you how happy I have been going through this experience with luckydogg. I've been sent multiple updates throughout, without ever having to ask even once. Luckydogg always asked for my input and i have had a say in every stage of the rebuilding of the cab. So firstly, THANK YOU LUCKYDOGG! For anyone reading this, please dont hesitate to deal with him in the future. Just an awesome experience all around.

Now, i Just wanted to share a little background on why I chose this theme (I know that it isn't your typical theme for a mame cab :). I am a musician and music really is a huge part of my life. It's my hobby (along with the silver ball of course) my profession, and something I will always do for fun (I gig all the time with a cover band basically for kicks and free beer ;). Since I started playing at the age of 12, pearl jam has been one of my favorite bands, and they still are. I go see them every time they come to toronto, even two nights in a row sometimes. These guys don't put on a fancy light show, or a choreographed act (hello Coldplay), but they just get on stage, plug in their gear and play their hearts out.

So now you get that i like pearl jam. But the reason I chose to pay homage to this band in a mame cab of all places is because of where the cab will be placed. I am moving to a new house tomorrow, and will be building a music room in the basement. The room will have a small stage where I can jam with my various bands and other musicians, and will have guitars on the walls, posters and other musically themed items. I figured that a pearl jam mame cab would be a unique and cool edition to this room, and would allow me to pay tribute to a band that has influenced me so much over the course of my musical life. I debated doing a generic rock n roll theme, but decided against it in the end even though this probably won't help the resale value of the cab......but hey, I don't plan to sell it so I didn't let that factor into my decision :). I can't wait for this baby to arrive this week, and thanks again luckydogg for reviving my beat up cab and giving it a fresh start! Happy long weekend to everyone else on pinballrev and i hope you all find that game you are inevitaly looking for :)
 

mwong168

Administrator
Staff member
Nov 14, 2012
6,656
1,409
113
45
Toronto
Looks good Luckydogg and just in time too as Elliot moves into his new home today!
 

Luckydogg420

Member
May 12, 2013
825
24
18
Kitchener
This is the inside of the cabinet, the LCD has been de-cased to have a clean look from the front. Two USB cables connect to the PC, there's wires for the pc speakers, power to the marquee lights and the quick connect for the service buttons.

This is a close up of the service buttons


And finally the bezel graphic installed


This is my first "blog" I guess. Let me know if there's any questions, or if I missed anything.

This is just a hobby for me, and I had a lot of fun with this project. It gave me a chance to use some of my tools that I don't regularly use.

Thanks for reading.
Patrick
 

Attachments

  • image.jpg
    image.jpg
    777.6 KB · Views: 228
  • image.jpg
    image.jpg
    798.1 KB · Views: 228
  • image.jpg
    image.jpg
    700.3 KB · Views: 227