Thought I would share my well documented, yet under utilized fix for early Williams System 11 games up to and including Fire! I find that very ironic...they fixed this design flaw–one that would literally start a fire in the backbox–after the release of the game Fire! PBRev member Grauwulf actually had some crispy wires occur while playing a Pin*bot due to this design flaw and posted about it (http://www.pinballrevolution.com/viewtopic.php?f=38&t=134&start=625#p15360) and followed up with photos of the deep fried wire (http://www.pinballrevolution.com/viewtopic.php?f=38&t=134&start=625#p15391) ...THAT should be more than enough reason to perform this relatively quick fix.
I’ll include links to a couple of sites at the end that may provide a better tutorial than I’m outlining here. Obviously, don’t do this with the machine on. Unplug the damn thing, too.
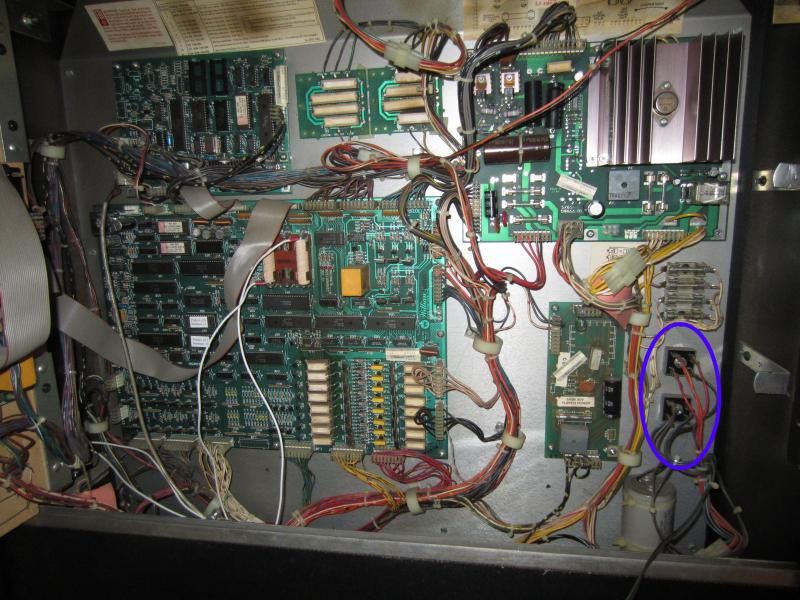
Locate the two bridge rectifiers mounted to the inside of the backbox. Hard to miss. The photos are from my Pin*Bot, but most from this era should be the same. Bridges will be on the lower right hand side.
I’ll be putting fuses in line with the positive 18 and 25 volt power flows, so if the bridges short or anything else funky happens with the transformer, the fuse will blow and the machine won’t. The process is the same for each bridge.
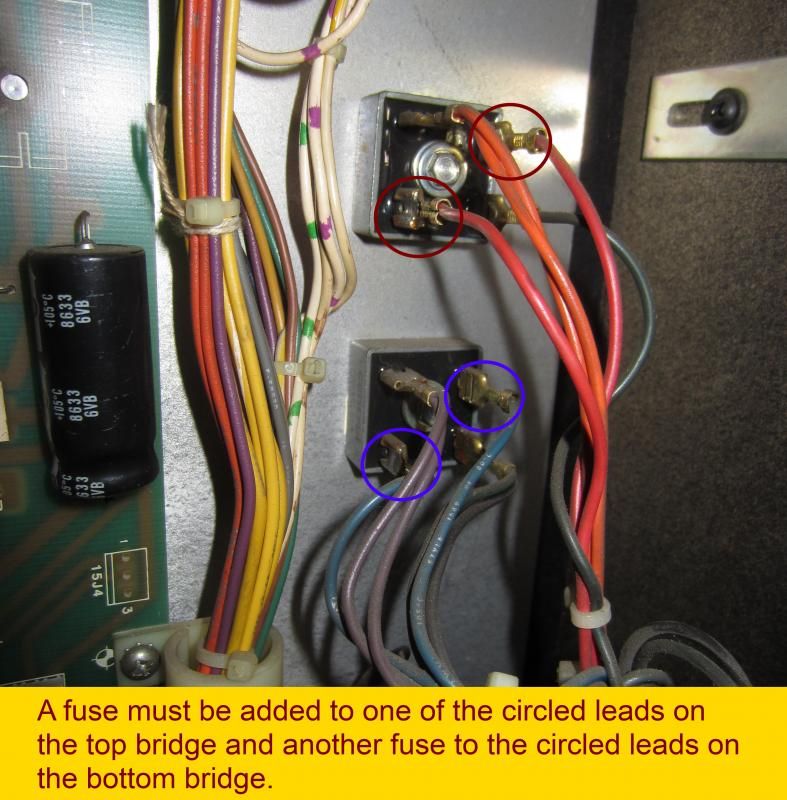
Bridge will have four leads. One lead will lay side to side, the other three will be standing up and down. We are NOT looking to modify the one that lays on its side (and has two wires attached), NOR are we looking at the one that sits diagonally across from it. We need one of the remaining two. In Pin*Bot’s case here, they sport matching red wires on the top BR, and matching blue wires on the bottom. Clay’s guide states that it doesn’t matter which of these two wires the fuse is put in line with as both are “AC” and run in line with each other. I chose the one at the top right terminal for both bridges.
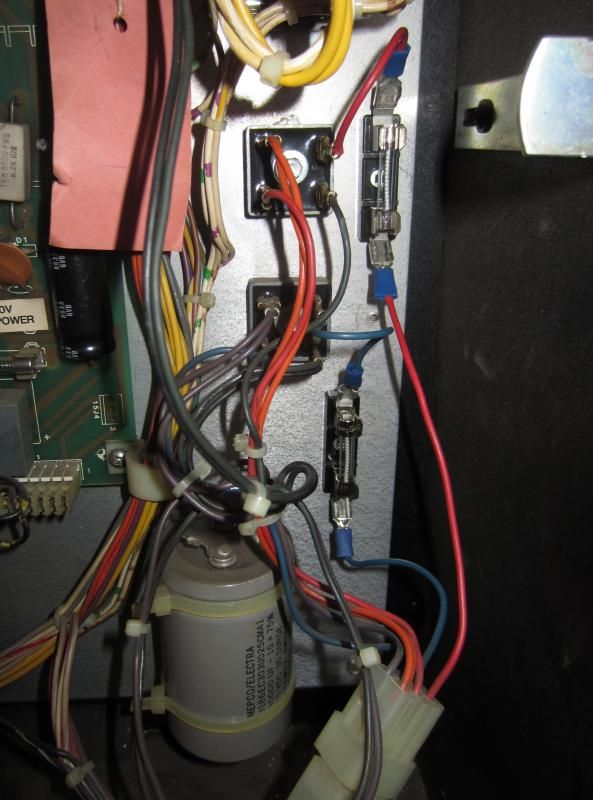
Snip the existing selected wire leaving enough room for both wires to reach the mounted fuse block. Affix a connector on each end of the snip. Mount a single fuse block near the rectifier being careful not to short it on any other nearby hardware. I pre-sunk a hole through the metal backbox plate with my cordless drill to make the mounting process easier...some may choose to mount them to the side of the backbox (in this case, new wire will have to be run for length). The connectors slide onto each lead of the fuse block. Williams chose to solder their slide connectors to the BR, so I did the same on the fuse block posts. Insert an 8AMP slow blow fuse. Check for continuity. Repeat process for the other BR.
Simple as that. Final product should look something like this:
To the more seasoned pin repair vets on the board: If I missed anything, or effed anything up, please let me know and I’ll modify what I have written, or feel free to add to the thread with more technical terms or tips.
LINKS:
Part One of Clay’s guide on Flipperwinkel that cover this fix (Jump to Section 2a):
http://techniek.flipperwinkel.nl/wms11/index1.html
Purcellville Pinball performs this fix on their FIRE! machine:
http://www.purcellvillepinball.com/fireinformation.html
I’ll include links to a couple of sites at the end that may provide a better tutorial than I’m outlining here. Obviously, don’t do this with the machine on. Unplug the damn thing, too.
Locate the two bridge rectifiers mounted to the inside of the backbox. Hard to miss. The photos are from my Pin*Bot, but most from this era should be the same. Bridges will be on the lower right hand side.
I’ll be putting fuses in line with the positive 18 and 25 volt power flows, so if the bridges short or anything else funky happens with the transformer, the fuse will blow and the machine won’t. The process is the same for each bridge.
Bridge will have four leads. One lead will lay side to side, the other three will be standing up and down. We are NOT looking to modify the one that lays on its side (and has two wires attached), NOR are we looking at the one that sits diagonally across from it. We need one of the remaining two. In Pin*Bot’s case here, they sport matching red wires on the top BR, and matching blue wires on the bottom. Clay’s guide states that it doesn’t matter which of these two wires the fuse is put in line with as both are “AC” and run in line with each other. I chose the one at the top right terminal for both bridges.
Snip the existing selected wire leaving enough room for both wires to reach the mounted fuse block. Affix a connector on each end of the snip. Mount a single fuse block near the rectifier being careful not to short it on any other nearby hardware. I pre-sunk a hole through the metal backbox plate with my cordless drill to make the mounting process easier...some may choose to mount them to the side of the backbox (in this case, new wire will have to be run for length). The connectors slide onto each lead of the fuse block. Williams chose to solder their slide connectors to the BR, so I did the same on the fuse block posts. Insert an 8AMP slow blow fuse. Check for continuity. Repeat process for the other BR.
Simple as that. Final product should look something like this:
To the more seasoned pin repair vets on the board: If I missed anything, or effed anything up, please let me know and I’ll modify what I have written, or feel free to add to the thread with more technical terms or tips.
LINKS:
Part One of Clay’s guide on Flipperwinkel that cover this fix (Jump to Section 2a):
http://techniek.flipperwinkel.nl/wms11/index1.html
Purcellville Pinball performs this fix on their FIRE! machine:
http://www.purcellvillepinball.com/fireinformation.html