You are using an out of date browser. It may not display this or other websites correctly.
You should upgrade or use an alternative browser.
You should upgrade or use an alternative browser.
Dr@No's fun filled (and often long-winded) restorations
- Thread starter DRANO
- Start date

Doesn't this create some sort of cosmic disturbance in the pinball balance of Canada? Taking a classic Bally out of PQ? I think the universe will collapse upon itself if Ontario gets their hands on one of their classic Sterns...we'd better tread lightly.
A very good point. No worries though quite yet.
2 of my 3 Classic Bally pins are in QC for a restore.
No "imploding" of the world just yet, just on the cusp.
And the balance shifts since Grand Lizard went to QC too.
The delicate Williams balance is now upset between ON + QC.
Someone needs to procure and bring home a Bally/Williams from QC.
I think Reg has it covered...
Bigbossfan
Active Member
Adriano, very talented and impressive work. I'd love to learn how to do some of this stuff one of these days. Must take the patience of a Saint. Maybe if my "wasting tax-payers dollars" job ends someday, I'll get the government to pay me to get trained in this stuff!! Right Mike??
Yep, rescuing the ToM from Quebec this weekend. Can't wait!!
Reg
Yep, rescuing the ToM from Quebec this weekend. Can't wait!!
Reg
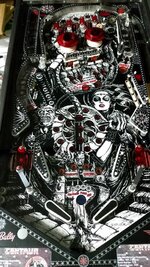
Well, I got Centaur all set up last night.
I wouldn't sweat the whole ON/QC pin balance issue just yet. As Scott indicated, quite a few nice pins have moved in the other direction over the last few months.
Sadly, these old games do not seem to travel very well. I was having some trouble with Centaur and wasn't able to play a game.
I noticed that the game would boot but the displays were dead and only a few lights were working. I could not start a game.
Further isnpection revealed a broken wire on the GI strand underneath the playfield. Fixed that.
Then, I had to wiggle one of the connectors to the main power board before it completed booting and I could start a game... so that connector obviously needs to be re-pinned, cleaned or adjusted.
And finally, when I did manage to start a game, the solenoid would fire to load a ball into the shooter lane, but no ball. Maybe there is some sort of obstruction?
In any case, it was late and all the basement tetris to get it set up had worn me out. I'll deal with it later.
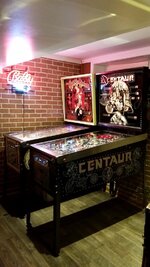
For now though, I have my little classic Bally corner looking pretty nice")
I wouldn't sweat the whole ON/QC pin balance issue just yet. As Scott indicated, quite a few nice pins have moved in the other direction over the last few months.
Sadly, these old games do not seem to travel very well. I was having some trouble with Centaur and wasn't able to play a game.
I noticed that the game would boot but the displays were dead and only a few lights were working. I could not start a game.
Further isnpection revealed a broken wire on the GI strand underneath the playfield. Fixed that.
Then, I had to wiggle one of the connectors to the main power board before it completed booting and I could start a game... so that connector obviously needs to be re-pinned, cleaned or adjusted.
And finally, when I did manage to start a game, the solenoid would fire to load a ball into the shooter lane, but no ball. Maybe there is some sort of obstruction?
In any case, it was late and all the basement tetris to get it set up had worn me out. I'll deal with it later.
For now though, I have my little classic Bally corner looking pretty nice
Attachments
Bigbossfan said:Adriano, very talented and impressive work. I'd love to learn how to do some of this stuff one of these days. Must take the patience of a Saint. Maybe if my "wasting tax-payers dollars" job ends someday, I'll get the government to pay me to get trained in this stuff!! Right Mike??
Yep, rescuing the ToM from Quebec this weekend. Can't wait!!
Reg
Thanks Reg.
Most of what I post anyone could do with a little practice. Other stuff, like airbrushing and mixing custom paints, might require a bit more of an art background and 'feel'... but a lot of it is just cleaning, maintenance and common sense.
You definitely need a bit of patience though.
Oh, and dibs on that TOM
Must have been like playing Jenga moving them around down there.
That Bally corner is looking better and better. I never miss a chance to play that EBD when I stop by...nicest looking one I've ever spent time on. Where did High Speed go?? I know the perfect place for it...beside Pinbot in my basement...
That Bally corner is looking better and better. I never miss a chance to play that EBD when I stop by...nicest looking one I've ever spent time on. Where did High Speed go?? I know the perfect place for it...beside Pinbot in my basement...
spiroagnew said:Where did High Speed go?? I know the perfect place for it...beside Pinbot in my basement...
Maybe next time you see it a clear ramp will be installed
mwong168 said:spiroagnew said:Where did High Speed go?? I know the perfect place for it...beside Pinbot in my basement...
Maybe next time you see it a clear ramp will be installed
And a new CPR playfield!
It's in the garage queue; folded up where Jacks Open was. JO cabinet is coming upstairs for a cleanup and, once I get that playfield done and re-installed, the game is gone. High Speed will then come upstairs and I'll slowly chip away at the swap; amongst my other projects. It'll be fun to have all my System 11 games in the garage side-by-side. Eventually I would like the North wall to be all early solid state/alphanumeric games. This may mean that all my new stern titles end up in the garage! Now that would be something. Not sure I can do it... but LOTR and TRON seem out of place with those 80's pins... and the Bally Williams wall is never gonna have an opening for the Sterns.
Don't get me statred on where RAZA and Predator are going :FP:
tkaye
Active Member
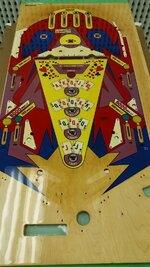
FULL HOUSE: getting through my playfield backlog one EM at a time: Jacks Open
Part 2
I posted the work I'm doing on this Jacks Open playfield about a week or so ago.
I wanted to show how the waterslide decals could be used to cover up artwork that would be tricky to restore in a traditional method... but I noticed that my playfield was still not 100% smooth so I did not apply them. You need a perfect surface to work with.
However, I did have to clearcoat over the red touch-ups I did and managed to apply one small waterslide decal with the Gottlieb maker's mark. You can see in the following images how it goes on and then how it blends in nicely after being clearcoated.
I'll have to be very carefull with the next sanding so I don't destroy any of this.
As soon as I can get a little muscle over at the house to help, I'll be bringing the main cabinet for this game into the workshop and begin the cleanup process on that!
I'm trying to force myself to have it out the door before the month is up.
Thanks for following along.
Adriano
Attachments
FULL HOUSE: getting through my playfield backlog one EM at a time: Jacks Open
Part 3
It's been a while since I've posted. Summer has a way of slowing things down... although, for me, looming renovations have doubled that effect.
The good news is that the family room is finally in the paint stage and I'm slowly starting to re-gain some garage and basement space as we clear things out.
I've finally brought the Jacks Open cabinet into the garage to start the general cleanup and then perform some touch-ups.
I'm using some Mean Green to get any grime off and then I'll be using some magic eraser and alcohol to see if I can remove some of the yellowing. I had good success with this technique when I restored my Centigrade 37.
I've also had one minor setback with this project.
I was having a difficult time getting the centre playfield inserts perfectly filled and level. That has finally been taken care of and everything is super smooth.
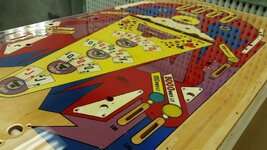
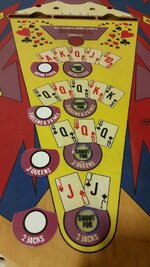
Afterwards I was really excited to attempt my experiment of using waterslide decals to cover up the damage around each insert. I had painstakingly scanned, corrected and printed the art for all four inserts and the surrounding art.
Unfortunately, my results were not great.
The waterslide decals have a certain level of transparency to them. This meant that they looked great while on the white backer paper, but once placed on the playfield, the original damaged areas could be seen through the decal. Also, the purple underneath now blended with the transparent purple of the decal and the colour just became too dark. My only option would be to paint over the entire area in pure white and then apply the decals on top; essentially covering all of the original art.
So, before I attempt anything so drastic, my next step will be to abandon the waterslide decals for now and simply attempt to trim and mask around all of the text as closely as I can and then mix as close a match to the purple as possible for airbrushing. It's a pain, but probably the best and safest way to do this at this stage.
Seems my goal of being done this project by July has been shot. But at least the end is in sight.
I also ordered a bunch of new white posts and other parts from Pinball Resource to make it all new and shiny once the pf is done.
I'll post more in a few days.
Trying to get this done while also keeping the missus happy and painting my family room
Part 3
It's been a while since I've posted. Summer has a way of slowing things down... although, for me, looming renovations have doubled that effect.
The good news is that the family room is finally in the paint stage and I'm slowly starting to re-gain some garage and basement space as we clear things out.
I've finally brought the Jacks Open cabinet into the garage to start the general cleanup and then perform some touch-ups.
I'm using some Mean Green to get any grime off and then I'll be using some magic eraser and alcohol to see if I can remove some of the yellowing. I had good success with this technique when I restored my Centigrade 37.
I've also had one minor setback with this project.
I was having a difficult time getting the centre playfield inserts perfectly filled and level. That has finally been taken care of and everything is super smooth.
Afterwards I was really excited to attempt my experiment of using waterslide decals to cover up the damage around each insert. I had painstakingly scanned, corrected and printed the art for all four inserts and the surrounding art.
Unfortunately, my results were not great.
The waterslide decals have a certain level of transparency to them. This meant that they looked great while on the white backer paper, but once placed on the playfield, the original damaged areas could be seen through the decal. Also, the purple underneath now blended with the transparent purple of the decal and the colour just became too dark. My only option would be to paint over the entire area in pure white and then apply the decals on top; essentially covering all of the original art.
So, before I attempt anything so drastic, my next step will be to abandon the waterslide decals for now and simply attempt to trim and mask around all of the text as closely as I can and then mix as close a match to the purple as possible for airbrushing. It's a pain, but probably the best and safest way to do this at this stage.
Seems my goal of being done this project by July has been shot. But at least the end is in sight.
I also ordered a bunch of new white posts and other parts from Pinball Resource to make it all new and shiny once the pf is done.
I'll post more in a few days.
Trying to get this done while also keeping the missus happy and painting my family room
Attachments
I won't get into all the boring details of ongoing home renovations and keeping small children entertained on Summer holiday... but suffice it to say that free time for pinball has been in short supply lately. Last weekend I finally got the majority of the work done (just before we had about 30 people over for the twins' 5th birthday party) and now I can breathe a little easier. With renos nearing completion, I've also regained a lot of my garage/shop space.
Although the owner of this Jacks Open has been very patient, it's time to kick things into gear again and get this project done.
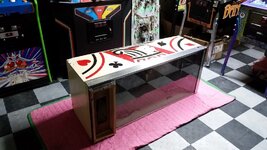
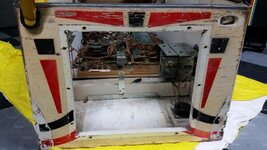
What little work I have been able to accomplish over the summer has been on the cabinet itself. I will post a separate update on the playfield in a few days but, for now, here are some shots of the cabinet cleanup.
I had promised the owner that I would "clean up" this rough and dirty cab... but not do a full restore. In my opinion, EMs lose a bit of character when you sand them clean and start from scratch. Not to mention it's a ton of work to trace and create your own stencils. This cabinet was yellow from years of smoke and maybe UV exposure, but it also had a bit of damage, including some burn marks, from some young pyromaniac no doubt
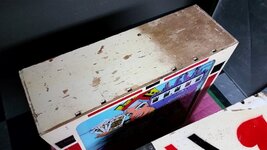
These 3 images show the first step I took, which was to clean the cab. I spray some mean grean and let it sit for a while and then wipe the game down. This gets rid of dirt mostly. Afterwards, I like to use a magic eraser and rubbing alcohol to rub out the top layer of the finish and get rid of the yellow smoke sludge. You can see a little before & after here.
The next step is simply touching up the damage as closely as you can. Again, this is not a total re-do, so there will be hi and low areas in the finish where there may have been some flaking, but still miles better than what it was originally.
I simply paint in the missing areas with acrylics (brush or pen; whatever works best) and I play aruond with the application. sometimes rubbing in with my finger for better blending.
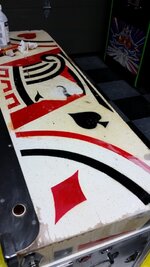
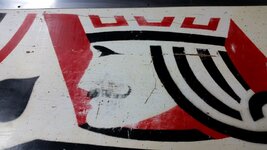
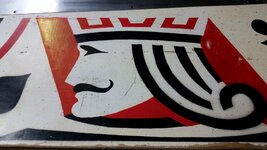
These close-ups show the king's face before and after.
Once I finished testing out the red and black, I went back and mixed up an ivory white that clsoely matched the newly cleaned cabinet base colour and covered up as much as I could. The final step was to add in the speckling by simply tapping my black acrylic pens randomly to disguise where I had painted. The corners that were bare wood now look a lot better.
Although the owner of this Jacks Open has been very patient, it's time to kick things into gear again and get this project done.
What little work I have been able to accomplish over the summer has been on the cabinet itself. I will post a separate update on the playfield in a few days but, for now, here are some shots of the cabinet cleanup.
I had promised the owner that I would "clean up" this rough and dirty cab... but not do a full restore. In my opinion, EMs lose a bit of character when you sand them clean and start from scratch. Not to mention it's a ton of work to trace and create your own stencils. This cabinet was yellow from years of smoke and maybe UV exposure, but it also had a bit of damage, including some burn marks, from some young pyromaniac no doubt
These 3 images show the first step I took, which was to clean the cab. I spray some mean grean and let it sit for a while and then wipe the game down. This gets rid of dirt mostly. Afterwards, I like to use a magic eraser and rubbing alcohol to rub out the top layer of the finish and get rid of the yellow smoke sludge. You can see a little before & after here.
The next step is simply touching up the damage as closely as you can. Again, this is not a total re-do, so there will be hi and low areas in the finish where there may have been some flaking, but still miles better than what it was originally.
I simply paint in the missing areas with acrylics (brush or pen; whatever works best) and I play aruond with the application. sometimes rubbing in with my finger for better blending.
These close-ups show the king's face before and after.
Once I finished testing out the red and black, I went back and mixed up an ivory white that clsoely matched the newly cleaned cabinet base colour and covered up as much as I could. The final step was to add in the speckling by simply tapping my black acrylic pens randomly to disguise where I had painted. The corners that were bare wood now look a lot better.
Attachments
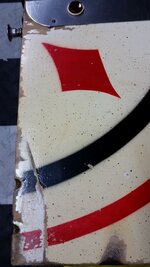
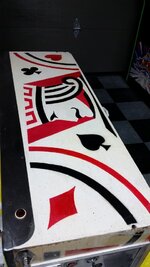
The front panel was extra nice :lol:
Here you see tons of missing/flaking paint and even some splitting wood. Here, my first step was to get some wood glue behind the splintering wood and press it down (clamp, tape, whatever works) and then go through the same process I already outlined before. Don't be afraid, the magic eraser will take off some flakes... but they are better off gone if they are not adhering well anyway.
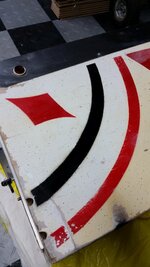
Again, some before and after:
And finally, two completed sides.
I repeat the same process for the left and then move onto the head cabinet.
Playfield updates coming soon....
Thanks.
Adriano
Here you see tons of missing/flaking paint and even some splitting wood. Here, my first step was to get some wood glue behind the splintering wood and press it down (clamp, tape, whatever works) and then go through the same process I already outlined before. Don't be afraid, the magic eraser will take off some flakes... but they are better off gone if they are not adhering well anyway.
Again, some before and after:
And finally, two completed sides.
I repeat the same process for the left and then move onto the head cabinet.
Playfield updates coming soon....
Thanks.
Adriano
Attachments
Menace said:So nice... Makes me wish I had time to work on my own games!
D
Ditto :FP:
Yeah... I'm not a fan of extreme restorations where they are not warranted. That and it costs a LOT more time and money.
For some games it makes sense or is even necessary, but sometimes a little cleaning and some touch-up is all you need.
Sure, the trained eye will be able to see the repairs, but to 90% of us that don't stare down the cab from 3" away, it looks great.
On a game like this, getting the payfield smooth, playing perfectly and protected is the primary concern.