• We have upgaded to the latest version of XenForum and the process finished without any errors!!!! Enjoy the new forum!

Dr@No's fun filled (and often long-winded) restorations

DRANO

Super Member
Nov 15, 2012
2,821
517
113
Mississauga
Sure... let me dig up some pics. I'm sure I documented the process.

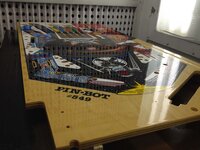
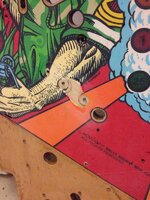
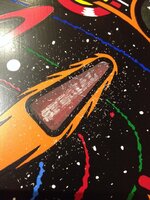
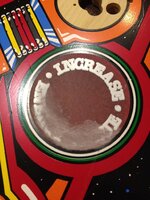
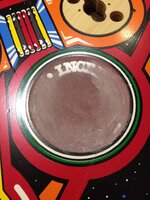
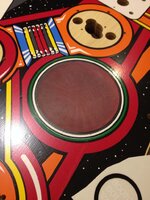
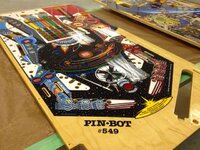
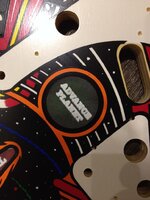
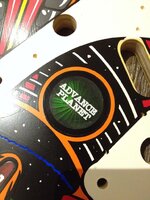
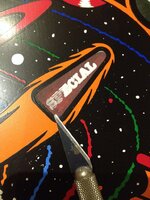
This is a special case though. This PINBOT came from CPR without clearcoat; as you know.

I assume this was because they were aware of the screening issues and knew that the buyer would likely want to address them. So, no clearcoat made the process much different from a typical insert repair and much easier as well.

I'll follow up soon.
Good idea.
 

DRANO

Super Member
Nov 15, 2012
2,821
517
113
Mississauga
JUST BECAUSE IT SAYS CPR... : repairing a CPR 'second' Pinbot playfield


Okay... PINBOT

As mentioned above, this CPR repro had some fuzzy screening that affected the white text on a few inserts.
After looking at some orginals, it was interesting to see that, even on those, some of the numbers like 25K, 50K etc. looked quite fat, while other text looked thin and clean. I set about to select the worst ones and treat those.

The good news is that there was no clearcoat! These pictures identify the tools/methods I tried out to scrape away the original screening and then replace it with new insert decals. I had never had to work on a playfield quite like this one.


I tried various blades to scrape away the art (being careful not to go outside the border of the insert). In the end, I foudn that a combination of sideways scraping and finishing with sandpaper got the cleanest results without gouging the plastic insert.
 

Attachments

  • IMG_5312.jpg
    IMG_5312.jpg
    178 KB · Views: 351
  • IMG_5319.jpg
    IMG_5319.jpg
    210.4 KB · Views: 350
  • IMG_5321.jpg
    IMG_5321.jpg
    217.5 KB · Views: 350
  • IMG_5323.jpg
    IMG_5323.jpg
    244.6 KB · Views: 350

DRANO

Super Member
Nov 15, 2012
2,821
517
113
Mississauga
Here's another insert and the final process of cleaning it up with sandpaper.


I started with 400 grit and worked in smooth circular motions up to 800 grit wet.
We want a smooth surface to apply the decals to.
 

Attachments

  • IMG_5325.jpg
    IMG_5325.jpg
    213.1 KB · Views: 349
  • IMG_5326.jpg
    IMG_5326.jpg
    240.7 KB · Views: 349
  • IMG_5327.jpg
    IMG_5327.jpg
    215.5 KB · Views: 349

DRANO

Super Member
Nov 15, 2012
2,821
517
113
Mississauga
I started applying a couple of decals and felt that the surface still wasn't quite smooth enough. I didn't want air bubbles or delamination, so I decided it would be best to clearcoat and sand smooth before doing the other 8 or 9 inserts.

This was a totally virgin playfield. It was pretty cool to lay down the very first layer of clear on top of the lacquer ink.


After this, I machine sanded everything smooth, gave it a good wipedown and simply applied all the decals... using windex to help with placement and then squeezing it out.

Last night I applied the first coat of clear that covered all the repaired inserts.
I will lightly block sand over each of the decals to get the clear perfectly flush, and then apply 2-3 more topcoats before it's done.


This was last night's work. I'll take nice close-ups once it's all done.
That's all for now ;)
Thanks

Adriano
 

Attachments

  • IMG_5517.jpg
    IMG_5517.jpg
    196 KB · Views: 346
  • photo 2.JPG
    photo 2.JPG
    193.3 KB · Views: 346

mwong168

Administrator
Staff member
Nov 14, 2012
6,654
1,405
113
45
Toronto
Menace said:
It's too bad you're putting in all that work for a Pinbot. Cooke would probably pass out if he saw this... :lol:

What about all that work he put on Cooke's Cheetah? :FP:

10967961074_3575016f4b_c.jpg
 

DRANO

Super Member
Nov 15, 2012
2,821
517
113
Mississauga
REVOLUTION said:
did you happen to get some PMS colours for me from that PF? :D

You know what?
I was actually planning to surprise you with that today.... and then I left my windowpane scanner at home :(

Will bring it tomorrow and scan the pf for you so you can match up the colours.
 

DRANO

Super Member
Nov 15, 2012
2,821
517
113
Mississauga
Since the topic sorta came up, I'd like to talk about one of the best tools I have in my toolbox.
It's an HP ScanJet 4670 windowpane scanner. The scanner has the ability to be handled and placed on a variety of surfaces while allowing the user to view through it and see what is being captured. I have used it to scan playfield inserts, cabinet decals and many other items.


Sadly, this model is no longer available and I don't think I've seen an equivalent on the market since it was discontinued.
I purchased mine slightly used on eBay for around $80. If you hunt around, they can be found.

Of course, a good suite of graphics software (like Photoshop) goes a long way, as does some graphic design ability.... but anythng can be learned.

Here's what I was able to do with it last night.
After some deliberation, I decided I would not be happy with my Super Sprint bezel and decided to take apart my original, scan it in several parts, assemble and then correct it for printing. Some files were available online, but nothing near the accuracy and quality that I needed to truthfully reproduce the part.

I will be attempting to produce this on an inket printer and then laminating to some heavier card stock before trimming and folding it.
Just another great use for this tool!
 

Attachments

  • Scanner.jpg
    Scanner.jpg
    89.3 KB · Views: 305
  • SS_sm.jpg
    SS_sm.jpg
    108.4 KB · Views: 305

REVOLUTION

Administrator
Staff member
Nov 13, 2012
2,314
76
48
46
GTA
www.pinballrevolution.com
I picked up a wand scanner and it's not quite the same. You can get some pretty skewed/warped scans from it if you're not careful. I'd like to eventually get one of these myself.
 

DRANO

Super Member
Nov 15, 2012
2,821
517
113
Mississauga
REVOLUTION said:
I picked up a wand scanner and it's not quite the same. You can get some pretty skewed/warped scans from it if you're not careful. I'd like to eventually get one of these myself.


For you ;)
 

Attachments

  • PB.jpg
    PB.jpg
    225.2 KB · Views: 483

DRANO

Super Member
Nov 15, 2012
2,821
517
113
Mississauga
START YOUR ENGINES: restoring my first vid; 1986 ATARI Super Sprint
Part 3


Got a little more done on the Super Sprint while also working on sanding down the 4 playfields in the spray booth.

Here are a few pieces.
 

Attachments

  • CP_overlay.jpg
    CP_overlay.jpg
    47.2 KB · Views: 456
  • CP_primer.jpg
    CP_primer.jpg
    39.8 KB · Views: 455
  • Footplate.JPG
    Footplate.JPG
    38.3 KB · Views: 455

DRANO

Super Member
Nov 15, 2012
2,821
517
113
Mississauga
Here's an example of sh!t going really wrong :(

I have to admit that I do not have a ton of experience working on playfields with no factory clearcoat.
I had this spare Special Force playfield and I wanted to give it a quick cleanup and maybe swap it into my game down the road. I really do enjoy it, but for a $400-$600 game, I'm not going to go crazy. Just some quick touch-up and clearcoat.
Anyway, I did not appreciate how thin my first coat was and, after getting a little agressive in one spot (trying to level off the clear) I burned right through the clear and artwork :FP:


Now, lucky for me, this is a Special Force.
And, even luckier, the damage is exactly under the inlane plastic and posts. It won't be noticed.
I attempted to do a quick repair and managed to do a pretty decent job. The orange area is messed up so I just added some orange to sort of 'prime' the wood... but I will be masking off the entire orange triangle and airbrushing it for a much smoother and clean repair. That'lll have to wait until I get another coat of clear on this though.


We learn more from our mistakes than our successes I guess.
In future I will be less hasty and wait for coats 2-4 to get the clearcoat perfectly level!

In a day or two I'll also cover how I make some insert decals for this playfield using waterslide decal paper and a laser printer.
 

Attachments

  • IMG_6590.JPG
    IMG_6590.JPG
    107.9 KB · Views: 454
  • IMG_6596.JPG
    IMG_6596.JPG
    100.6 KB · Views: 454

DRANO

Super Member
Nov 15, 2012
2,821
517
113
Mississauga
WARLOCK said:
Whew eh?
However, I am sure
Drano could fix it anyway.

Still... I'd rather not have to ;)

Seems I was a little careless.
There is definitely a "feel" that comes with practice when sanding, painting and other stuff.
Guess I didn't have it that day.
Will surely be more careful with older playfields in future. Better to err on the side of caution.
 

DRANO

Super Member
Nov 15, 2012
2,821
517
113
Mississauga
START YOUR ENGINES: restoring my first vid; 1986 ATARI Super Sprint
Part 4


I've been playing around with my Super Sprint cabinet a bit in an effort to get it standing and off my shop floor. It takes up way too much room.
Sadly, my touch-up and painting attempts on the cabinet are not yielding good results. My rattle can paint is reacting poorly with whatever the original paint was. I cannot get a clean surface so I've decided to follow the advice of several seasoned vid guys and just apply a good acrylic melamine paint with a smooth roller. Guess I'll get to that this weekend.

However, I do have one very positive update on this project. After scanning and correcting that Super Sprint bezel I finally got a couple of prints done up.
At first I was a bit worried the vinyl print would look too shiny. The technician offered to run some matte laminate film over the print to reduce this and it looked great.
Then I went out a bought some thick Bainbridge card stock to adhere the print too. I coud not believe my eyes. The print took on the texture of the board and it almost ended up looking NOS! Last night I cut and assembled one. It came out beautifully! Super excited to get this into the head cabinet once that's all painted and fixed.


More to come soon.
Thanks for following along
 

Attachments

  • photo 1.JPG
    photo 1.JPG
    96.8 KB · Views: 399
  • photo 2.JPG
    photo 2.JPG
    114.9 KB · Views: 399
  • photo 3.JPG
    photo 3.JPG
    108.2 KB · Views: 399
  • photo 4.JPG
    photo 4.JPG
    129.6 KB · Views: 399

mwong168

Administrator
Staff member
Nov 14, 2012
6,654
1,405
113
45
Toronto
Amazing work as usual Drano and I can't wait to finally play this once you have it all back together.